Saturday, November 10, 2012

Dynamic Color Coding in SSRS Charts

In this article, I will explain how to change the color of a chart dynamically. In other words, how to provide custom color palette feature at run time.

Lets start off with an example including step by step operations.

Step1. Open or create new Report Server Project. I am creating a new Report Server Project using SQL Server 2012 and saved it with LearnSSRS2012 name.

Step2. Add new Shared Data Source by right click on "Shared Data Sources" folder.

 
 Now give any name to Share Data Source (Local, in my case) and click on Edit button to define Server Name and Database Name. In this example, I will use static data sources so I am using "." (you can also use "(local)") as ServerName. I am not defining any Database name so I will keep it blank (default will be msater). You can define any database, if you want. Now click on OK.


Step3. Now create a new report by clicking on Reports --> Add --> New Item --> Report --> Add. I don't like default report name like Report1, Report2, Report3 so I have renamed it to ChartColorCode.rdl.

Step4. Create Data Source for ChartColorCode report. To create a new Data Source, right click on "Data Sources" followed by "Add Data Sources" under Report Data as shown below:
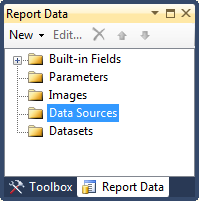


We will use Shared Data Source we created above. So click on "Use shared data source reference" and select Local data source created at step 2. Give any name to this report level data source. I will assign "Local" again. Click OK to proceed.


Step5. Now lets create couple of datasets. To create a new dataset, right click on "Datastes" followed by "Add Datastes" under Report Data as shown below:


I will use two data sources in this example, one for Color Palette and another for Chart.

To create new Dataset for ColorPalette, Right click on DataSets --> Add Dataset... and type "ColorPalette" in Name textbox. Select "Use a dataset embedded in my report" option and select Local as Data Source.


Select Text option in "Query Type" and type following query in Query window:

SELECT 'Red' AS ColorName UNION
SELECT 'DarkOrange' AS ColorName UNION
SELECT 'Green' AS ColorName UNION
SELECT 'Blue' AS ColorName UNION
SELECT 'Olive' AS ColorName UNION
SELECT 'SeaGreen' AS ColorName UNION
SELECT 'Brown' AS ColorName UNION
SELECT 'Gray' AS ColorName UNION
SELECT 'Tomato' AS ColorName

Click OK to proceed.


Create one more dataset using following query and name it Chart.ds:

SELECT 2010 AS [Year], 12000 Amount UNION
SELECT 2011 AS [Year], 15000 Amount UNION
SELECT 2012 AS [Year], 13000 Amount


Step6. Drag and drop "3D Cylinder"  bar chart from toolbox. Drag and drop Amount field from Chart.ds to value field (Y axis) and Year field to Category Groups as shown below.


To make the chart more meaningful and dainty, do following formatting:
1. Replace Chart Title with "Year vs Amount".
2. Replace Y Axis Title with Amount.
3. Repalce X Axis Title with Year.
4. Remove the Chart Legend.
5. Change the font size and color as you wish.
6. Right click on the bar and select "Show Data Labels". Select Times New Roman in data labels font because numbers are better visible in this font.

After incorporating all the above changes, click on Preview tab to view the report. My report looks like one shown below:


Step7. Now I will explain how to change the chart color at run-time.
First of all, I will create a report parameter for dynamic color. Click on Parameters folders in Report Data and then click on Add Parameter... Define pColor as report parameter Name and Color as Prompt. Select parameter visibility Hidden. You can keep it as Visible if you wish to do so.


Click on Available Values under Report Parameter Properties window. Select "Get values from a query" option under "Select from one of the following options". Select ColorPalette in Dataset box, ColorName in "Value field", and ColorName in "Label field".

Click on Default Values under Report Parameter Properties window. Select "Get values from a query" option under "Select from one of the following options". Select ColorPalette in Dataset box, and ColorName in "Value field". Click OK to proceed.


Step8. Drag and drop Table control from toolbox.
Do set following properties for table control.
a) Table control will have three default columns. Delete one column.
b) Merge Table Header and write "Color Palette" in the textbox.
c) Write following expression in the second column of Table Details.
=IIF(Parameters!pColor.Value=Fields!ColorName.Value, "◄","")
 and write following expression in background property of same text box:
=Fields!ColorName.Value

d) Select Table Details and then right click --> select "Row Group" --> select "Group properties"


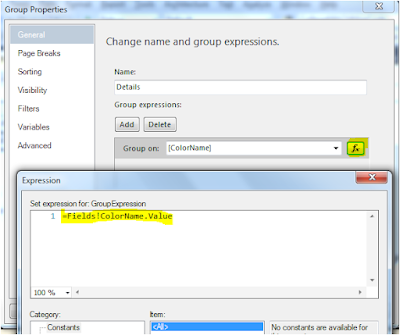
e) In "Group Properties" window, click on expression button under "Group on" box and write following expression =Fields!ColorName.Value.


f) Select first text box of Table Details and then right click to select "Test Box Properties" as highlighted below:


g) in "Text Box Properties" dialogue box, click on Action and select "Go to report" under "Enable as an action" and "ChartColorCode" in "Specify a report" box. Also select report parameter pColor in Name and [ColorName] in Value as shown below:


Step9. Now we are at the final step where we need to change the properties of bar chart to change the color at run time. Right click on bar chart and select "Series Properties".


In "Series Properties" window, click on Fill. and then click on expression button to open Expression window. Double click on pColor under parameter or write following expression  manually as shown below:
=Parameters!pColor.Value


Step10. Its time to run the report and see the results.

First Preview:


Second Preview: Following report will be displayed once we click on Red color under:


Third Preview: Following report will be displayed once we click on DarkOrange color under:


I hope you like this article!


Saturday, October 27, 2012

SSIS Logging

In this article I'm writting about Logging features in SQL Server Integration Services (SSIS).

I'hv been using SSIS since last 6-7 years and I have had to implement Logging Mechanism in almost all the projects to track/debug the execution of each and every task/event used in the package. Some of you may say its pretty easy to implement - still I guess we need to take care of logging because some of the things are not so easy.

Integration Services includes logging features that write log entries whenever run-time events occur but the good thing is that it can also write custom messages. Also SSIS supports a diverse set of log providers that can write log entries to: Text files, SQL Server Profiler, SQL Server, Windows Event Log, or XML files.

My favourite log is SQL Sevrer because using sql table I can write my own queries to find logging info related to specific task/event or any failure easily.

Basically SSIS logs are associated with packages and are configured at the package level. The task(s)/container(s) in a package can be enabled for logging even if the package itself is not e.g enable logging on an Execute SQL task without enabling logging on the parent package. Also package/container/task can write to multiple logs. You can enable logging on the package only, however you can choose to enable logging on any individual task/container.

You can select a level of logging as per your requirement by specifying the events to log and the information to log for each event, however some events provide more useful information than others.

I'll explain Logging using SQL Server 2012.
Note: SSIS 2005 uses table sysDtsLog90 for logging and SSIS 2008 & SSIS 2012 use sysSSISLog table for logging.

Below is the description of each element in the log schema:
ElementDescription
ComputerThe name of the computer on which the log event occurred.
OperatorThe identity of the user who executed the package.
SourceThe name of the container or task in which the log event occurred.
SourceIDThe unique identifier of the package;
the For Loop, Foreach Loop, or Sequence container;
or the task in which the log event occurred.
ExecutionIDThe GUID of the package execution instance.
StartTimeThe time at which the container or task starts to run.
EndTimeThe time at which the container or task stops running.
DataCodeAn integer value from the DTSExecResult enumeration
that indicates the result of running task:
  • 0 - Success
  • 1 - Failure
  • 2 - Completed
  • 3 - Canceled
DataBytesA byte array specific to the log entry.
The meaning of this field varies by log entry.
MessageA message associated with the log entry.

The following table describes the predefined events that can be enabled to write log entries when run-time events occur:
EventsDescription
OnErrorWrites a log entry when an error occurs.
OnExecStatusChangedWrites a log entry when the execution status of the executable changes.
OnInformationWrites a log entry during the validation and execution of an executable to report information.
OnPostExecuteWrites a log entry immediately after the executable has finished running.
OnPostValidateWrites a log entry when the validation of the executable finishes.
OnPreExecuteWrites a log entry immediately before the executable runs.
OnPreValidateWrites a log entry when the validation of the executable starts.
OnProgressWrites a log entry when measurable progress is made by the executable.
OnQueryCancelWrites a log entry at any juncture in the task processing where it is feasible to cancel execution.
OnTaskFailedWrites a log entry when a task fails.
OnVariableValueChangedWrites a log entry when the value of a variable changes.
OnWarningWrites a log entry when a warning occurs.
PipelineComponentTimeFor each data flow component, writes a log entry for each phase of validation and execution. The log entry specifies the processing time for each phase.
DiagnosticWrites a log entry that provides diagnostic information e.g. you can log a message before and after every call to an external data provider.


Implementing Logging in SSIS 2012

To implement the SSIS logging, follow these steps:

Step1. Create a Connection Manager for logging database. Right click on Connection Managers area and click on New OLE DB Connections... as shown below:

Step2. In the "Configure OLE DB Connection Manager" click on Create button. Now select Server Name and database name from Connect a database. I am using (Local) server and Test database. Click on Test Connection button to verify the connection.


Finally click on OK button to save the connection manager. This will create a new connection manage with ServerName.DatabaseName name. In my example, it is (local).Test. You can rename it to appropriate and meaningful name. For instance cmLogging.

Step3. Right click anywhere on the package surface area in the Control Flow to open Configure SSIS Log: Package wizard.  Check the Package folder checkbox (left side) to enable the logging. Under the "Providers and Log" tab, select "SSIS log provider for SQL Server" in Provider type and click on Add button t add this logging for the package. Finally, click on Configuration to select the logging connection manager. Select cmLogging as connection manager.


Step4. Select logging events.
To prevent log files from using large amounts of disk space, which could degrade performance, you can limit logging by selecting specific events and information items to log. For example, you can configure a log to capture only the date and the computer name along with error message. It is not a good idea to log all the events. Under "Details" tab, select required events for logging:


Step5. Click on Advance button to set advance properties of the logging events.

Finally click on the OK button to save logging configuration.

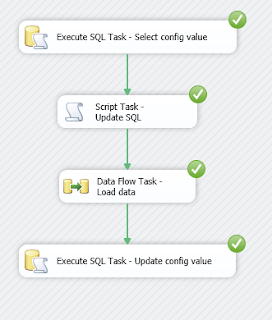
Step6. Now you can validate your logging information by executing the SSIS package. To get more information about hoe to execute SSIS package, click Different ways to Execute SSIS packages. My package looks like the picture shown below:
You can see the log in sysSSISLog table after executing the package.

SELECT * FROM Test.dbo.sysssislog


Monday, October 1, 2012

How to find missing Identity/Sequence numbers using T-SQL?


SQL Developers, did you ever come across a situation where you need to find missing identity or sequence number for a given table? For instance, someone deleted few records from a table which has an IDENTITY column. Have you wondered how to find those missing rows? In this blogpost, I am going to explain different ways to find missing identity or sequence numbers.

First I will create some sample data for demonstration purpose.
-- Prepare Test data --
SET NOCOUNT ON
IF OBJECT_ID('dbo.TestData') IS NOT NULL    DROP TABLE dbo.TestData

CREATE TABLE dbo.TestData (
    ID INT IDENTITY(1, 1) NOT NULL
)

DECLARE @Counter INT = 1
WHILE @Counter <= 15
BEGIN
    INSERT dbo.TestData DEFAULT VALUES
    SET @Counter += 1
END
 

SELECT ID FROM dbo.TestData


Now lets delete some rows manualy:
-- Now delete some records (IDs)
DELETE dbo.TestData WHERE ID IN (3,7,8,10,12,13)
 
--Verifiy the data
SELECT ID FROM dbo.TestData

 
Below are three different ways to identity missing values.
 
Find missing sequence numbers using Ranking Function:
-------------------------------------------
-- Option 1: Using Ranking function
-------------------------------------------
DECLARE @MaxID INT = (SELECT MAX(ID) FROM dbo.TestData)

SELECT SeqID AS MissingSeqID
FROM (SELECT ROW_NUMBER() OVER (ORDER BY column_id) SeqID from sys.columns) LkUp
LEFT JOIN dbo.TestData t ON t.ID = LkUp.SeqID
WHERE t.ID is null and SeqID < @MaxID

Here is the output:
 
 -- If there are less records in sys.columns and
-- you need need larger result then use CROSS JOIN
SELECT SeqID AS MissingSeqID
FROM (SELECT ROW_NUMBER() OVER (ORDER BY c1.column_id) SeqID
FROM sys.columns c1
CROSS JOIN sys.columns c2) LkUp
LEFT JOIN dbo.TestData t ON t.ID = LkUp.SeqID
WHERE t.ID is null and SeqID < @MaxID
 

Find missing sequence numbers using CTE:
-------------------------------------------
-- Option 2: Using Common Table Expression
-------------------------------------------
DECLARE @MaxID INT = (SELECT MAX(ID) FROM dbo.TestData)
;WITH CTE (MissingSeqID, MaxID)
AS (
    SELECT 1 AS MissingSeqID, @MaxID
    UNION ALL
    SELECT MissingSeqID + 1, MaxID FROM CTE WHERE MissingSeqID < MaxID
    )
SELECT MissingSeqID FROM CTE
LEFT JOIN dbo.TestData t on t.ID = CTE.MissingSeqID
WHERE t.ID is NULL
GO
 
 
Find missing sequence numbers using Tally Table:
This is the most prefered way out of all the above options.
-------------------------------------------
-- Option 3: Using Tally Table
-------------------------------------------
DECLARE @MaxID INT = (SELECT MAX(ID) FROM dbo.TestData)
SELECT t.ID  MissingSeqID FROM dbo.Tally t
LEFT JOIN dbo.TestData td
ON td.ID = t.ID
WHERE td.ID IS NULL
AND t.ID < @MaxID


Sunday, September 16, 2012

Different ways to Execute SSIS Packages

We have the following ways to execute SSIS packages:
  • DTExec Command Line Utility
  • DTExecUI Windows Application
  • SQL Server Agent

DTExec Command Line Utility
SQL Server provides the command line tool DTExec.exe which can be used to execute an SSIS package. DTExec can be run from a Command Prompt or from a batch (.BAT) file.
To begin, open a Command Prompt and navigate to the project folder as shown below (I am taking an example of SalesForcastInput package from local directory "D:\SSIS\Hari\Sample\SSIS-Sample1\SalesForcastInput.dtsx"):


Now type the following command to execute the SalesForecastInput.dtsx package:

DTEXEC /FILE SalesForecastInput.dtsx

To see the complete list of command line options for DTEXEC, type following:
DTEXEC   /? 


It is not necessary to navigate command prompt to package directory before executing DTExec command; You can give the full path of your package as shown below:
DTExec /f "D:\SSIS\Hari\Sample\SSIS-Sample1\SalesForcastInput.dtsx" /conf "D:\SSIS\Hari\Sample\SSIS-Sample1\SalesForcastInput.dtsConfig" /M -1

Here, /f (/File) parameter used to load the package that is saved in the file system in your system. Likewise, /conf (/ConfigFile) parameter used to load the configuration file that is saved in the file system in your system. /M (/MaxConcurrent) specifies the number of executable files that the package can run concurrently.

Click here for more information about DTExec utility and it's parameters.


DTExecUI Windows Application

SQL Server includes the Windows application DTExecUI.exe which can be used to execute an SSIS package. DTExecUI provides a graphical user interface that can be used to specify the various options to be set when executing an SSIS package. You can launch DTEXECUI by double-clicking on an SSIS package file (.dtsx).
To begin, navigate to the your project folder. Double-click on the package (For instance, SalesForecastInput.dtsx in my example) and you will see the following multi-page dialog displayed:


As you can see there are many settings available when you use this utility. As a general rule you can simply click the Execute button to run your package. You can also fine tune your execution by clicking through the various screens and entering your own settings. After changing the settings click on Command Line which will show you the DTExec command line based on the settings you have chosen.
Note: If you have a configuration file which is not configured at package level, then do not forget to add the configuration file through Configurations setting.


Scheduling SSIS Package through SQL Server Agent

SQL Server Agent includes the SQL Server Integration Services Package job step type which allows you to execute an SSIS package in a SQL Server Agent job step. This can be especially handy as it allows you to schedule the execution of SSIS package so that it runs without any user interaction.
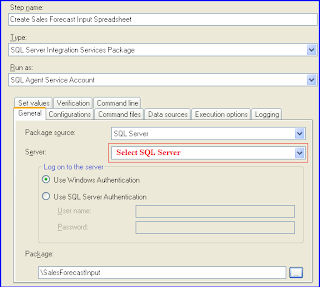
To begin, open SQL Server Management Studio (SSMS), connect to the Database Engine, and drill down to the SQL Server Agent node in the Object Explorer. Right click on the Jobs node and select New Job from the popup menu. Go to the Steps page, click New, and fill in the dialog as shown below:


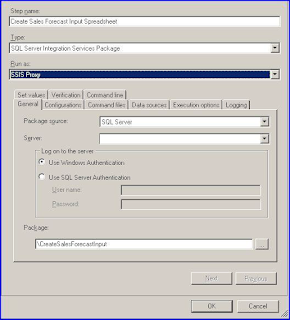
In the above example, the SSIS package to be executed is deployed to SQL Server (i.e. the MSDB database). You can also execute packages deployed to the file system or the SSIS package store. Note that the Run as setting is the SQL Agent Service Account. This is the default setting although from a security standpoint it may not be what you want. You can setup a Proxy that allows you to give a particular credential permission to execute an SSIS package from a SQL Server Agent job step.


Saturday, September 1, 2012

Columnstore Index


Columnstore index was introduced in the SQL Server 2012 to significantly speed-up the processing time of common data warehousing queries.

Generally data warehousing workloads involve summarizing large volume of data. As you might know, we use different techniques in data-warehousing (DW) and decision support systems (DSS) to improve performance like pre-computed summary tables, indexed views, OLAP cubes etc. Although, these techniques greatly speed up query the data processing but they have some side effects. These techniques can be inflexible, hard to maintain, and must be designed specifically for specific query problem.

Data warehousing processing overhead can be significantly reduced by using SQL Server Columnstore index. Not only that, columnstore indexes reduces the overhead of the other solutions. Columnstore indexes also enable queries to compute the results quickly so that pre-computation is not required.


Characterisitcs of SQL Server Columnstore Indexes:

·        Columnar data format – unlike the traditional row based organization of data (called rowstore format), columnstore indexes group and store data in one column at a time. SQL Server query processing can take advantage of this new data layout and significantly improve query execution time.

·        Faster query results – Columnstore indexes can produce faster results for the following reasons:

o    Only the columns needed must be read. Therefore, less data is read from disk to memory and then from memory to processor cache.
o    Columns are heavily compressed. This reduces the number of bytes that must be read and moved and hence less I/O operations.
o    Most queries do not touch all columns of the table. Therefore, many columns will never be brought into memory. This, combined with excellent compression, improves buffer pool usage, which reduces total I/O.
o    Advanced query execution technology processes chunks of columns called batches in a streamlined manner, reducing CPU usage.
·        Key columns – There is no concept of key columns in a columnstore index.

·        Clustered index key – all the columns of clustered index must be present in the nonclustered columnstore index. If a column in the clustering key is not listed in the create index statement, it will be added to the columnstore index automatically.

·        Partitioning – Columnstore indexes works with table partitioning. No change to the table partitioning syntax is required. Albeit, nonclustered columnstore index can only be created on a partitioned table if the partitioning column is part of the columnstore index.

·        Record Size – There is no index key record size limitation on columnstore indexes.

·        Query processing – Along with the columnstore index, SQL Server introduces batch processing to take advantage of the columnar orientation of the data. The columnstore structure and batch processing both contribute to performance gains.

·        Table cannot be updated – For SQL Server 2012, a table with a columnstore index cannot be updated.


How to create Columnstore Index:

Columnstore index can be create using SQL Server Management Studio as well as using T-SQL.

Creating Columnstore index by using SQL Server Management Studio (SSMS): 

1.       Open Management Studio and use Object Explorer to connect to the SQL Server Database Engine.
2.       In Object Explorer, expand the instance of SQL Server, expand Databases, expand a database, expand a table, right-click on required table, point to New Index, and then click Non-Clustered Columnstore Index.
3.       In the Index name dialog box, under the General tab, type a name for the new index, and then click Add.
4.       In the Select Columns dialog box, select the columns to participate in the columnstore index, and then click OK two times to create the index.


Creating Columnstore index by using T-SQL:

Create columnstore index on Employee table, name it CSI_Employee, and include all the columns!


-- Check whether index CSI_Employee exists on Employee
-- and delete if exists.
IF EXISTS(  SELECT  name FROM sys.indexes
            WHERE   object_id = OBJECT_ID('dbo.Employee')
            AND     name = 'CSI_Employee')
DROP INDEX CSI_Employee ON dbo.Employee
GO
 
-- Create nonclustered columnstore index CSI_Employee on Employee.
CREATE NONCLUSTERED COLUMNSTORE INDEX CSI_Employee
ON dbo.Employee
(
     EmployeeID
    ,FirstName
    ,MiddleName
    ,LastName
    ,DOB
    ,DepartmentID
)
GO 

Data Types

Columnstore index support some data-types and doesn't support others. You need to be aware of this while creating columnstore index to avoid any run time errors.

The following data types can be included in a columnstore index:
·        char and varchar
·        nchar and nvarchar (except varchar(max) and nvarchar(max))
·        decimal (and numeric) (Except with precision greater than 18 digits.)
·        int, bigint, smallint, and tinyint
·        float (and real)
·        bit
·        money and smallmoney
·        All date and time data types (except datetimeoffset with scale greater than 2)

The following data types cannot be included in a columnstore index:
·        binary and varbinary
·        ntext, text, and image
·        varchar(max) and nvarchar(max)
·     uniqueidentifier
·         timestamp
·         sql_variant
·         decimal and numeric with precision greater than 18 digits
·         datetimeoffset with scale greater than 2
·         CLR types (hierarchyid and spatial types)
·         xml

 
There are certain restrictions and limitations on columnstore indexes which are listed below:

·         Columnstor index cannot have more than 1024 columns.
·         Columnstor index annot be clustered or unique. Only nonclustered columnstore indexes are available.
·         Columnstor index cannot be created on a view or indexed view.
·         Cannot include columns of restricted data-types as mentioned above.
·         Cannot act as a primary key or a foreign key.
·         Cannot be changed using the ALTER INDEX statement. Drop and re-create the columnstore index instead.
·         Cannot be created with the INCLUDE keyword.
·         Cannot include the ASC or DESC keywords for sorting the index. Columnstore indexes are ordered according to the compression algorithms.
·         Does not use or keep statistics in the manner of a traditional index.

Note: You can compare the performance optimization be executing heavy volume queries before and after creating columnstore index. You might get 50% to 90% performance gain!
 

Here are few FREE resources you may find helpful.